Beauty on a Budget! DIY Deep – Cleaning Makeup Brushes

Beauty

IMG_2167

Hello there!

Today, we’re going to be environmentally conscious and economically savvy :).

ALL that in ADDITION to deep-cleaning your makeup brushes!

Sounds good, doesn’t it?

So let’s begin!

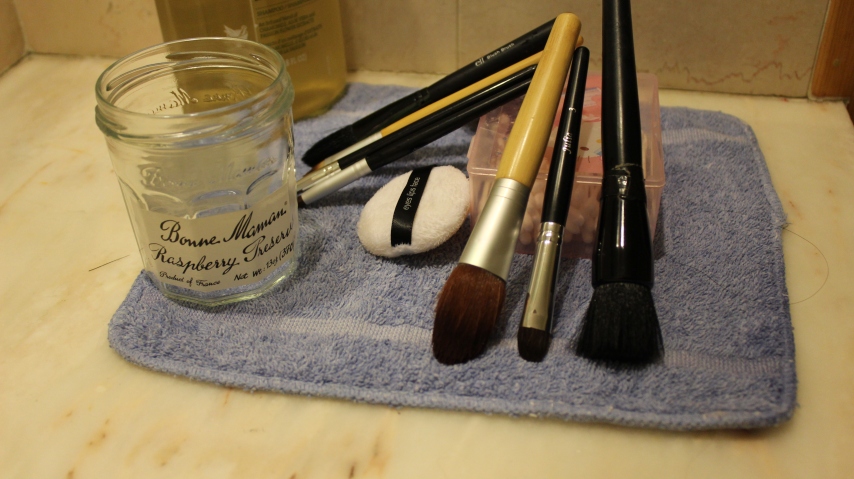
THE CAST OF CHARACTERS:

IMG_2189  IMG_2184

(top left) Shampoo (I used this one because I couldn’t find my baby shampoo. It works!)

(top right) An object higher in elevation than the brushes (It’ll make sense later)

(bottom left) An empty jar

(bottom right) Dirty brushes and a small towel

IMG_2182  IMG_2173

THE STEPS:

1.) Pump a quarter-size dollop of shampoo into the jar

2.) Pour in hot water from the faucet into the jar, stimulating the shampoo to bubble

You want just enough so that placing the brushes inside won’t cause a flood

3.) Place the brushes inside and let soak for a few seconds

4.) Swirl one brush at a time against the jar’s bottom to knock out makeup product

5.) Rinse the bristles quickly and set aside on the small towel

6.) Repeat until all brushes are squeaky clean

7.) Place the higher object in the center of the towel, then place the brushes with the handles leaning against the object so the bristles touch the towel

This makes sure no residual water stays in the brush handle and causes rusting/damage to the brush

8.) Wait to dry, then use the brushes to your heart’s content!

IMG_2165

I love how these few steps allow me to save time (washing) and money (shampoo), as well as water (because most of it is in the jar)!

If you’re more of a visual person than a person of “the written word,” feel free to click any of the pictures in this post and get directed to the video I created to communicate the deep-cleaning process.

Play some fun music and make this time fun! 🙂

brush cleaner official 3

I hope you found this helpful, and have a lovely day!

Love,

Jess

[craftspace] DIY birthday cards on the double!

craftspace

Why, hello there! This past week, I volunteered to whip up four birthday cards… in half an hour. I already spent quite a bit of time perusing birthday cards in little boutiques – then realized trying to figure out which card “fit” each person’s personality (and the cost of the cards themselves) didn’t make the venture worthwhile. Making them myself sounded a lot more fun, gave me the chance to make it more personal, and didn’t take add a dime to my budget! 😉 The cards also had to provide enough writing space so many people could write sweet little messages to each person- don’t think I would have been able to find a card like that! Want to see and/or make them yourself? Have a look-see down below!

Materials you will need:

1) Some paper – I originally planned to make the cards using calligraphy paper. Why? I had a lot of it, it was a lovely texture, and it seemed cute!

IMG_0028

IMG_0027

IMG_0040

2) Some string-like material.

IMG_0029

3. Scissors. AKA some blades of doom! or just cutting. Your choice.

IMG_0030

4. A hole-punch!

IMG_0042

5. Decorations! Stickers, tape, more stickers, stickers, stickers. Fun :). It’s like revisiting your childhood without all the ice cream, running around in the park, playing with the slip ‘n slides in the summer… Hmm. That doesn’t sound so bad.

IMG_0031 IMG_0032 IMG_0033 IMG_0034

6. Markers!

IMG_0037

[hackspace] DIY Hairtie Container

hackspace

Whenever I have a container of some kind, be it a jam jar, a delivered box, or even an empty floss container, I feel this strange urge to keep it. Sometimes it’s smart, and other times, may I say… cluttered? But this one is a win for sure!

Estimated score to date: containers: 5, Me: 1. It’s the little victories that count! And well, it’s the stories that get told that are remembered, right? And here is the tale of my little win 🙂

DIY Hairtie Container

First, acquire an empty floss container.

Image

Then, find those evasive little hairties!

Image

Yes, you! Here’s one hiding next to a box.

Image

Here’s one hiding on the corner of my drawer.ImageThey’re ruthless, these little ones. I mean, seriously?

Image

Anywhoo, after you round up those little rascals, open the empty floss container. This should be super easy to do!

Image

And voila!

Image

It vaguely appears to be doing sit-ups. Which I should probably be doing… But I digress.

Here’s a close-up! And simply place those babies around that center part to make them easy to take out later.

ImageYay!Image

Now just snap it back up…Image

And look at that! Too easy, right? Image

I hope this was helpful for you! Quick tips to make life easier 🙂 What could be better?

Now it’s time for me to figure out how to use my other containers…

Tootle-loo!